Showing posts with label air con. Show all posts

Sunday, 1 June 2014

Cooling Coil (Evaporator Coil) Basics for Air Conditioning & Heat Pump Systems
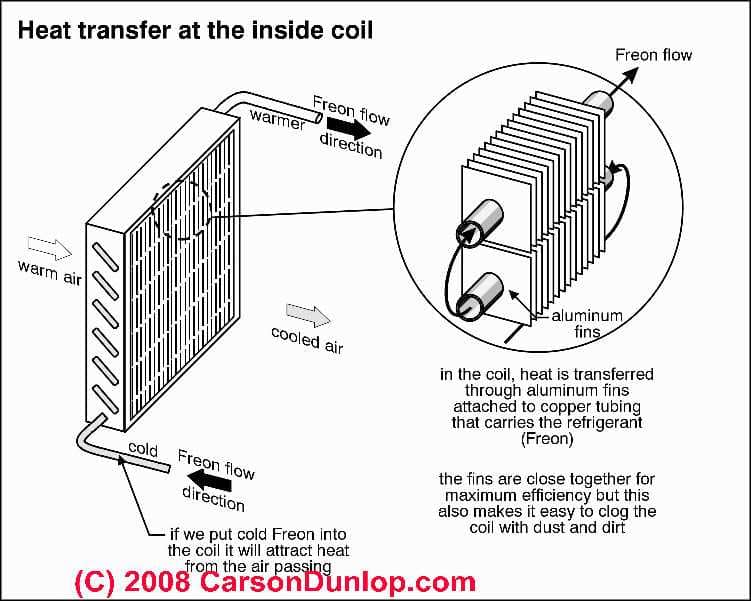
Cooling Coil (Evaporator Coil) Basics for Air Conditioning & Heat Pump Systems

Schematic of an air conditioning cooling or evaporating coil (C) Carson Dunlop AssociatesIf your air conditioning or heat pump system has lost its cooling capacity or won't start see REPAIR GUIDE for AIR CONDITIONERS.
See How to determine the cooling capacity of air conditioning equipment if the system seems to be working but is inadequate to cool your building.
Contact us to suggest text changes and additions and, if you wish, to receive online listing and credit for that contribution. Page top photo of an iced-up air conditioning evaporator coil are courtesy Guy Benfante.
The cooling coil or evaporator coil is where building indoor air cooling actually takes place.
The liquid air conditioning refrigerant entering the cooling coil through the metering device (a capillary tube or THERMOSTATIC EXPANSION VALVE) is increasingly changed to gas form as it "boils" or evaporates as the liquid refrigerant flows through the cooling or "evaporator" coil, so that at the end of the cooling coil the refrigerant is totally in gaseous form.
This state change (liquid to gas refrigerant) absorbs energy, cooling the tubing and fins of the cooling coil and thus indirectly, cooling and dehumidifying indoor air that is blown across the coil.
A cooling coil which is blocked by debris or ice and frost, or which is damaged can obstruct air flow and reduce air conditioning system output. The air conditioning system evaporator coil and problems include ice and frost build-up, dirt or debris blocking air flow through the coil, and damaged or leaky cooling coils.
We also discuss how cooling coils may be cleaned in-place and what to watch out for during that procedure. Cooling coils which are part of an air conditioning retrofit installation onto an existing warm air heating system can also present special problems of sizing and air flow, discussed further at ADDING A/C: RETROFIT SIZING. Sketch of heat transfer at the inside coil, also called the cooling coil or evaporator coil, courtesy of Carson Dunlop Associates.
If ice, dirt, or damage block air flow across or through the cooling coil (evaporator coil) in an air conditioner, the cool air output will be substantially reduced or may even stop entirely.
Below we describe how the cooling coil works, what goes wrong with this component, and how its problems are diagnosed by simple visual inspection (inside of the air handler) or by some simple temperature measurements.

How To Inspect, Test, & Diagnose Cooling Coil (Evaporator Coil) Air Conditioner or Heat Pump Problems

Damaged fins on an air conditioning coil (C) InspectAPedia.comWhere to look for cooling coil problems:
First, make a visual inspection of the cooling coil. Most air handlers provide an access panel or cover that can be removed to give at least partial view of the cooling coil surfaces.
Turn off electrical power to the system to be safe from electrical shock.
On opening an access cover or panel on the air handler you can recognize the cooling coil from our photos and sketches shown here and elsewhere on this website. You may need to use a flashlight and mirror to see the coil surfaces.
Remember to inspect the cooling coil from the incoming-air side - the side of the coil facing the blower fan assembly. That's because any dirt or debris entering the coil will come principally from this direction. If you inspect the wrong side of the coil it may look perfectly clean even though it is totally blocked by debris on its other surface.
DIRTY COOLING COIL has photos of just how blocked a cooling coil can become in an air conditioner or heat pump.
Here are some common defects to look for at the evaporator coil (cooling coil) in an air conditioner or heat pump:
  • Dirt or debris blocking air flow through the coil (DIRTY COOLING COIL)
  • Ice or frost formation blocking air flow through the coil (FROST BUILD-UP on AIR CONDITIONER COILS)
  • Damaged cooling / evaporator coil fins over more than 10% of the coil surface, blocking air flow (shown in our photo at left in this case, the damage is to a condensing coil, not an evaporator coil). Small areas of damaged cooling fins can be straightened and cleaned-up using a cooling coil comb. Cooling coils with extensive physical damage such as shown in our photograph need to be replaced.
  • Evidence of refrigerant leaks (visual evidence may include stains from refrigerant oil left at the point of leakage) (REFRIGERANT LEAK DETECTION)
  • Evidence of mold growth on organic debris on the coil or elsewhere in the blower compartment (Mold Growth in Air Handlers)
  • Presence of unusual materials on the coil surface such as rodent debris, bird feathers and debris, fiberglass insulation, large trash fragments like paper or leaves confirming a duct or air filter problem. Some of these may indicate potentially serious health risks such as rodent or bird feces and debris which risk bacterial and viral hazards in building air. (Leaks, Rodents In Air Handlers)
  • Obvious coil-to-air-handler size mismatch of an add-on cooling coil onto an existing warm air system (ADDING A/C: RETROFIT SIZING)
  • Evaporator coil or cooling leaks or holes: if an evaporator coil is leaking (or also if the condensing coil is leaking) you'll find out pretty quickly as refrigerant will be lost and the cooling system will stop providing cool air. You'll need expert diagnosis by an HVAC service technician.
    • A lot depends on where the refrigerant leak has occurred and what caused the leak. If the cooling coil has a single point leak caused by some mechanical damage (one of our readers accidentally drilled a hole in his coil while trying to drill a drain hole in his air handler), it may be possible to find the hole and repair it using silver solder.
    • If the refrigerant leak is in copper tubing anywhere in the cooling or heat pump system that is not too close to an evaporator coil or condensing coil, it should be possible to solder a repair, then evacuate and recharge the cooling system.
    • If the refrigerant leak is in copper tubing in or close to the cooling coil (or in a condensing coil) a solder repair is hard to complete because the heat of the soldering process tends to de-solder other nearby connections. It might be possible if the technician is very expert and if s/he knows how to keep nearby surfaces cooled (we've used a wet rag).
    • If the refrigerant leak is in an aluminum part, soldering aluminum is more tricky and may not be feasible. Ordinary procedures using a torch, for example, just melt the aluminum. Expert welders use inert gas welding methods.
    • If the refrigerant leak is due to severe corrosion anywhere in an HVAC system we're not optimistic that a solder repair is possible. The conditions that caused a corrosion-related leak are likely to have thinned and weakened other parts. The cost of an attempted repair may be wasted.
    • Replacement of the cooling coil (or condensing coil) is more often going to be recommended by your HVAC technician because of these difficulties.
Temperature measurements at the cooling coil: see OPERATING TEMPERATURES for a discussion of where and how air temperature measurements are made to diagnose cooling coil or other air conditioner operating problems.
Below we introduce some of the more common air conditioner or heat pump cooling coil or evaporator coil defects and repairs.
Air flow requirements across the air conditioning evaporator coil: if airflow is weak for any reason (dirty coil, duct system defects, blower fan defects, dirty blower squirrel cage fan), the air conditioning system will not operate properly. Some experts write that there should be between 350 and 400 cubic feet of air per minute (CFM) moving across the evaporator (cooling) coil for each ton of air conditioner capacity.
One ton of cooling or heating capacity = 12,000 BTUH so if your AC unit or heat pump is a 24,000 BTUH unit it is a "two ton" unit and needs to see 700 to 800 CFM of air across the evaporator coil.
Some home inspectors and air conditioning service technicians carry a small airflow meter that can actually measure this number with fair accuracy. (The same tool is nice for comparing air flow and balancing air flow at various building supply ducts and registers.

How Air Conditioning & Heat Pump Evaporator Coils (Cooling coils) are Cleaned

Evaporator coil cleaning often requires cutting refrigerant lines, removal of the coil and other components for cleaning, and reinstallation, pulling a vacuum on the refrigerant lines, and recharge with refrigerant. Such service and repair may involve significant expense, although there are some "in place" cleaning methods using foams and sprays that are a simpler procedure. See DIRTY COIL CLEANING PROCEDURES for details of this topic.

FROST BUILD-UP - Frost Build-up on the Evaporator Coil in an Air Conditioner
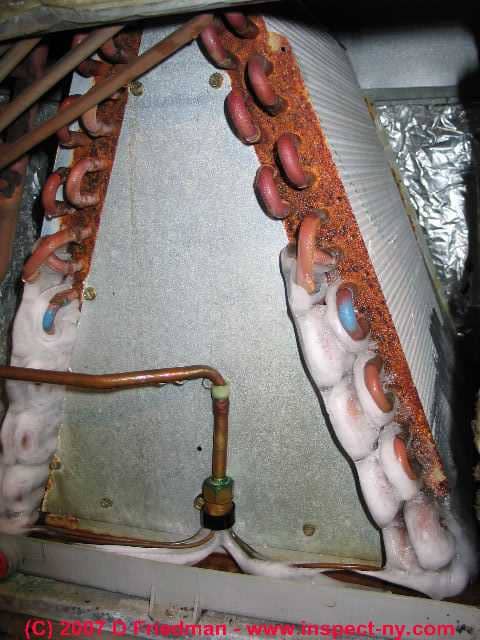
Photograph of attic air conditioning air handler, condensate drips on floorThe ice or frost formed on a cooling coil in an air conditioner air handler unit is usually caused by an improper refrigerant charge, possibly by inadequate air flow across the cooling coil, or by a thermostatic expansion valve (TEV) or other air conditioner or heat pump control defect.
Ice blocks air flow through the coil, thus reducing air conditioner output; if the ice formation is extreme nearly all of the airflow across the coil is blocked and the air conditioner system runs but does not produce cool air flowing into the occupied space.
Frost and ice can also form on refrigerant tubing at other locations, and frost and ice can form inside air conditioning duct work itself, leading to troublesome leaks into the building.
Details of what causes frost on air conditioning equipment, what problems that creates, and how to diagnose and repair icing or frost on cooling coils or other air conditioner parts are provided at FROST BUILD-UP on AIR CONDITIONER COILS. TThis article explains locations and causes of condensate, frost or ice formation in air conditioning systems, air handlers, compressor/condensers, refrigerant lines, and in air ducts.
Note that frost formation at some cooling coils (not air conditioners or dehumidifiers) may be normal. We discuss frosting and non-frosting cooling coil types and coil defrosting methods further at Frosting vs. Non-Frosting Types of Evaporator Coils

BLOCKED COOLING COIL - Air Conditioner Evaporator Coil Blocked by Debris or Dirt
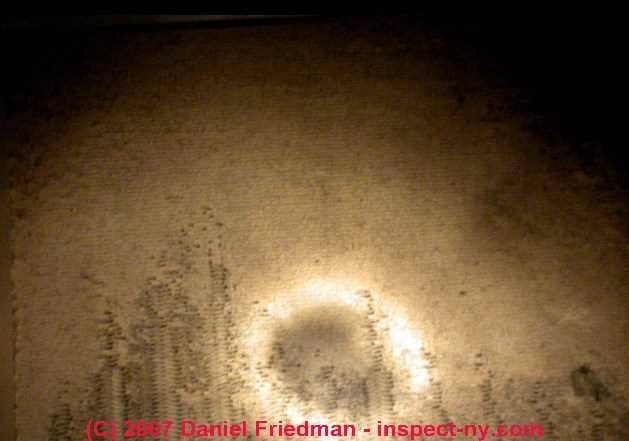
Photograph of a dirt blocked air conditioning evaporator coilIce is not the only (nor even the most common) cause of blocked air flow in an air conditioner. This photograph shows how easily debris can stick to and clog the inlet side of the cooling coil in an air conditioning system. This evaporator coil was nearly totally blocked with dust and debris. How does this happen?
There was no air filter installed in the system. Ordinary house dust is comprised largely of fabric fibers and skin cells.
These and other debris in building dust such as soot and organic particles like pollen and mold spores all join to form a gray mat on the fins of the cooling coil in an air handler.
Debris sticks particularly quickly to this surface because of the combination of close spacing of the cooling fins (about 1/16" apart) and the fact that condensate forming on the coil keeps the surface damp.
Details about the detection and cleaning of dirt and debris which block an air conditioner cooling coil are at DIRTY COOLING COIL.

Types of Evaporators or Evaporator Coils or Cooling Coils: Dry vs Flooded Evaporator Coil Designs
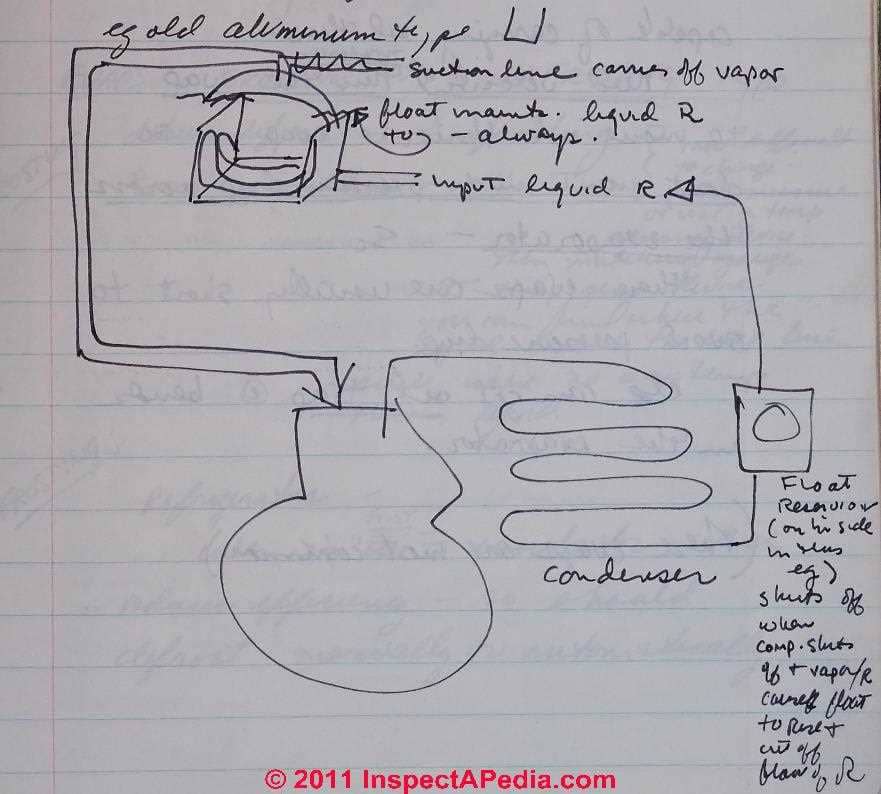
Evaporator types (C) D FriedmanThere are two types of evaporators used in refrigeration systems: flooded and dry evaporator coils.
Dry Evaporator Coils: in a dry evaporator coil design, all of the refrigerant entering the evaporator coil enters as a vapor (or gas).
In a dry type evaporator coil (or cooling coil) the refrigerant oil travels constantly in the system along with the refrigerant, and some oil is discharged into the condenser. That is, only liquid refrigerant can actually carry oil.
In the evaporator the refrigerant is vaporized and the oil travels through, but the vapor is less capable of actually carrying the oil through the coil.
For the oil to pass through we need refrigerant gas velocity and turbulence in the evaporator coil, so we do not want much pressure drop across the evaporator coil.
Therefore dry evaporator type coils are usually short - to avoid much pressure drop.
Otherwise we get oil traps at the bends in the evaporator coil.
These are the more common type of evaporator coil or cooling coil in refrigeration systems. So, for example, for a small air conditioner that has to be packed into a small space, to keep the evaporator length short the manifold system may used to run several short evaporator loops in parallel - to avoid long individual tubing runs that might cause an ensuing refrigerant pressure drop and oil traps in the system.
[An oil trap will clog or prevent refrigerant flow through the evaporator and thus will prevent the system from working. A symptom might be loss of cooling and high refrigerant pressures on the high side]
Flooded Evaporator Coils: in a flooded evaporator coil design, the evaporator is constantly full of refrigerant, whether the cooling system is "on" or "off". See our cooling coil sketches shown here.

Frosting vs. Non-Frosting Types of Evaporator Coils
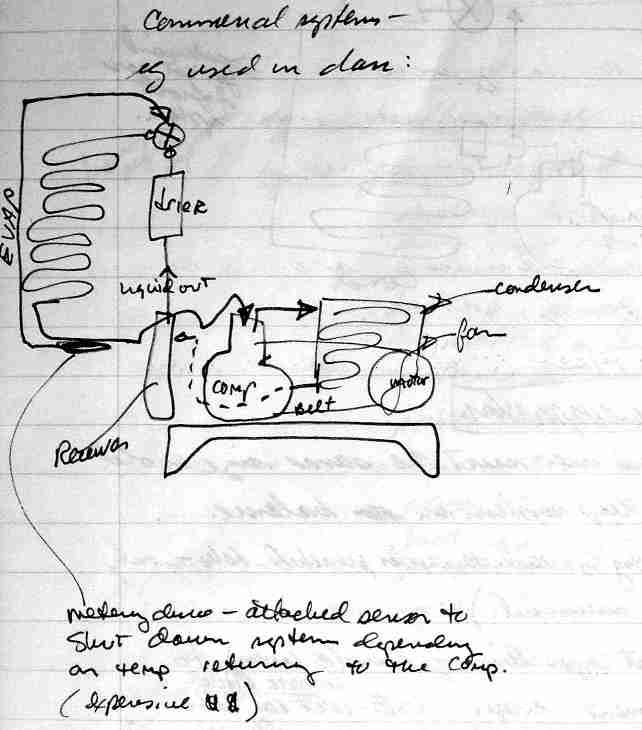
Commercial refrigeration system (C) D FriedmanOur sketch (left) shows the basic layout of a commercial refrigeration system. Here we detail the difference between frosting and non-frosting evaporator coils and we explain how frosting-type systems must be defrosted to keep working.

Non-Frosting Evaporator or Cooling Coils - No Defrosting Needed

Dehumidifiers are examples of non-frosting type cooling coil designs. These devices are basically little "air conditioners" or cooling systems in their design (though their warm air output is exhausted directly into the same space). The dehumidifier system is a refrigeration system designed such that the coil will never form ice or frost.
Room air conditioners (portable or window or through wall units) are also examples of non-frosting type cooling coil designs.
These "frost-proof" or non-frosting systems (in normal operation) ar more difficult to charge: you must use a precisely measured charge or a temperature-sensing device and matching gauge with the temperature-sensing device - you find where the liquid ends in the evaporator line - where there is no further change in temperature in the evaporator coil tubing, there is no more liquid refrigerant present.
If you see ice or frost on these cooling coils it's an abnormal condition that needs to be diagnosed and repaired. See our diagnostic advice at FROST BUILD-UP on AIR CONDITIONER COILS

Defrosting Methods for Cooling Coils (Evaporator Coils) in Refrigeration Systems

Frosting Evaporator or Cooling Coils Require a Defrost Cycle

Examples of frosting evaporator coils or cooling coils include refrigerators (or freezers). When more than 1/4 of the surface is ice or frost that condition acts as an insulator that reduces the efficiency of the appliance, so the appliance will have to defrost itself - either automatically or manually.
There are two defrosting methods commonly used in frosting-evaporator coil designs:
Defrost by electrical resistance heating (common on refrigerators, including frost-resistance for door faces and jambs using extra resistance heating elements in those areas too);
Refrigeration system defrost methods (C) D FriedmanDefrost by hot gas: a solenoid in the compressor discharge line shuts [sketch above left] down vapor from the condenser and deposits high pressure/high temperature refrigerant gas directly into the evaporator coil, bypassing the refrigerant metering valve (TEV or cap tube).
The problem with dumping high temperature refrigerant vapor into the cold (iced, needs defrosting) evaporator is that it causes it to begin to condense - back pressure of the gas goes up and head pressure at the condenser goes down - now liquid refrigerant can back up to the compressor (where it would cause damage).
To avoid compressor damage from liquid refrigerant during this defrost cycle we add heat at the end of the evaporator coil (cooling coil) to insure that refrigerant reenters the compressor as a vapor, never as a liquid. Typically, setting a maximum of 20 minutes of defrost cycle adds protection against warming up food in the refrigerator or freezer where this design is used.
The refrigeration compressor continues to run during the defrost cycle in the hot gas method case, but the compressor will not keep running during the defrost cycle in the electrical resistance defrost cycle method.

When is cooling coil frosting abnormal?

Note that on dehumidifiers and air conditioners or heat pumps frost or ice formation on the cooling coil is not normal and is an indication of the need for repairs. See our diagnostic advice at FROST BUILD-UP on AIR CONDITIONER COILS

How cooling coils are changed-out or replaced

When an evaporator coil or cooling coil needs replacement (perhaps because the old one is damaged or leaky):
  • Because replacing a cooling coil or evaporator coil is a lot of work (and costly) first see if the old coil can be preserved. Combs can straighten out damaged cooling coil fins if they are not corroded too badly; and special expoxies are available to seal punched holes - a moderately successful repair attempt. If the coil is leaking due to corrosion, epoxy is probably a waste of time - replace the coil.
  • The new cooling coil must be the same size as the old one it replaces in order to keep the system in balance.
  • A short copper line is connected to the coil (at the factory) - use a wet rag or a flare block as a heat sink to avoid putting excess heat on this copper line (which may be connected to an aluminum coil by epoxy) during soldering the new evaporator coil to the existing refrigerant supply and suction lines.
  • On newer HVAC and refrigeration systems you will usually have to cut out the old coil in place, removing both the coil and the foam poured around it. On older systems there may be screws and an access panel, usually on the freezer side of the coil in that equipment.


possible causes of failure in the air conditioner system

Some of the possible causes of failure in the system are listed in the air conditioner troubleshooting guide below. 

No Cooling Effect
Suction Frost
Low Pressure Switch Cuts-Off
High Pressure Switch Cuts-Off
High Pressure Side Too High
High Pressure Side Too Low
Low Pressure Side Too High
Low Pressure Side Too Low
Both Low Pressure and High Pressure Too High
Both Low Pressure and High Pressure Too Low
High Pressure Too Low and Low Pressure Too High


No Cooling Effect Air Conditioner Troubleshooting 
  • Refrigerant is undercharged
  • Air conditioner unit is under capacity
  • Compressor valve damage or ineffective compression
  • Too much opening or inadequate opening of thermo valve
  • Ineffective contact of sensor bulb of thermo valve
  • Expansion valve not effective
  • Filter drier or strainer is clogged
  • Air filter is clogged
  • Evaporator coil is dirty
  • Fan coil motor is rotating in the reverse direction
  • Fan motor belt loose or slip
  • Temperature setting of thermostat too high
  • Expansion valve oversized or undersized
  • R.P.M of fan coil blower too low
  • Duct damper is closed
  • Duct resistance too high
  • Supply air short-circuit
Suction Frost Air Conditioner Troubleshooting 
  • Air conditioner unit is over capacity
  • Air filter is clogged
  • Room temperature is too low
  • Evaporator coil is dirty
  • Fan coil motor is rotating in the reverse direction
  • Fan motor belt loose or slip
  • Temperature setting of thermostat too low
  • R.P.M of fan coil blower too low
  • Duct damper is closed
  • Duct resistance too high
  • Supply air short-circuit
  • Ambient temperature too low
Low Pressure Switch Cuts-Off Air Conditioner Troubleshooting 
  • Fan coil motor is rotating in the reverse direction
  • Fan motor belt loose or slip
  • Temperature setting of thermostat too low
  • R.P.M of fan coil blower too low
  • Duct damper is closed
  • Duct resistance too high
  • Supply air short-circuit
  • Ambient temperature too low
  • Expansion valve undersized
  • Low pressure switch is not working
  • Refrigerant undercharge
  • Air conditioner unit is over capacity
  • Expansion valve clogged
  • Ineffective expansion valve
  • Air filter is clogged
  • Room temperature is too low
  • Evaporator coil is dirty
High Pressure Switch Cuts-Off 
  • Overcharge of refrigerant
  • Air inside refrigerant circuit
  • Condenser water flow too little
  • Condenser inlet water temperature too high
  • Condenser is dirty
  • Air in condenser water flow
  • Refrigerant discharge valve blocked or closed
  • Condenser water circulating in the reverse direction
  • Condenser coil is very dirty
  • Condenser fan motor is not running
  • Condenser fan motor is rotating in the reverse direction
  • Poor air circulation of the condenser or air circulation blocked
  • High pressure switch not functioning
  • Condenser water pump malfunction
  • Cooling tower fan not running
  • Condenser water valves closed
  • Cooling tower fan rotates in the reverse direction
High Pressure Side Too High 
  • Overcharge of refrigerant
  • Air inside refrigerant circuit
  • Condenser water flow too little
  • Condenser inlet water temperature too high
  • Condenser is dirty
  • Air in condenser water flow
  • Refrigerant discharge valve blocked or closed
  • Air conditioner unit is under capacity
  • Condenser water circulating in the reverse direction
  • Condenser coil is very dirty
  • Condenser fan motor is not running
  • Condenser fan motor is rotating in the reverse direction
  • Poor air circulation of the condenser or air circulation blocked
  • Condenser water pump malfunction
  • Cooling tower fan not running
  • Condenser water valves closed
  • Cooling tower fan rotates in the reverse direction
High Pressure Side Too Low 
  • Refrigerant is undercharged
  • Excessive condenser water flow
  • Condenser outlet water temperature too low
  • Air conditioner unit is over capacity
  • Ineffective compression of compresor or valve is damaged
  • Ambient temperature too low
Low Pressure Side Too High 
  • Refrigerant is overcharged
  • Expansion valve is oversized
  • Air conditioner unit is under capacity
  • Excessive opening of thermo valve
  • Ineffective compression of compresor or valve is damaged
  • Ineffective contact of sensor bulb of thermo valve
Low Pressure Side Too Low 
  • Fan coil motor is rotating in the reverse direction
  • Fan motor belt loose or slip
  • Temperature setting of thermostat too low
  • R.P.M of fan coil blower too low
  • Duct damper is closed
  • Duct resistance too high
  • Supply air short-circuit
  • Expansion valve undersized
  • Refrigerant is undercharged
  • Air conditioner unit is over capacity
  • Not enough opening of thermo valve
  • Expansion valve clogged
  • Ineffective expansion valve
  • Air filter is clogged
  • Room temperature is too low
  • Evaporator coil is dirty
Both Low Pressure and High Pressure Too High 
  • Condenser coil is very dirty
  • Condenser fan motor is not running
  • Condenser fan motor is rotating in the reverse direction
  • Poor air circulation of the condenser or air circulation blocked
  • Condenser water pump malfunction
  • Cooling tower fan not running
  • Condenser water valves closed
  • Cooling tower fan rotates in the reverse direction
  • Overcharge of refrigerant
  • Air inside refrigerant circuit
  • Condenser water flow too little
  • Condenser inlet water temperature too high
  • Condenser is dirty
  • Air in condenser water flow
  • Air conditioner unit is under capacity
  • Excessive opening of thermo valve
  • Ineffective contact of sensor bulb of thermo valve
  • Condenser water is circulating in the reverse direction
Both Low Pressure and High Pressure Too Low 
  • Fan coil motor is rotating in the reverse direction
  • Fan motor belt loose or slip
  • Temperature setting of thermostat too low
  • R.P.M of fan coil blower too low
  • Duct damper is closed
  • Duct resistance too high
  • Supply air short-circuit
  • Expansion valve undersized
  • Refrigerant is undercharged
  • Air conditioner unit is over capacity
  • Not enough opening of thermo valve
  • Expansion valve clogged
  • Ineffective expansion valve
  • Air filter is clogged
  • Room temperature is too low
  • Evaporator coil is dirty
  • Ambient temperature too low
  • Excessive condenser water flow
  • Condenser outlet water temperature too low
  • Filter drier or strainer is clogged
High Pressure Too Low and Low Pressure Too High 
  • Compressor valve damaged or ineffective compression

26 point air con check list

An Air Comfort Systems Maintenance Visit is definitely needed sometime during the air conditioning season, and should be scheduled during any season the air conditioner normally operates. (an outdoor temperature of at least 65 degrees is required)  If your air conditioner receives regular maintenance by a skilled Air Comfort technician, it should keep cooling reliably throughout the summer..  Here's what we check -- "bargain" tuneups just don't compare!

    1Check Expansion ValveThe Expansion Valve is a device that is used to meter the amount of refrigerant that runs through the system.  It is important that the sensing probe is not corroded or misaligned and that the tube connecting the valve to the sensing bulb is not kinked.BENEFITS:  Keeps the system cooling at peak efficiency, providing comfort and economy of operation..
    2Inspect and Clean Evaporator DrainA clogged evaporator drain can cause water damage to the furnace as well as affect indoor humidity levels.BENEFITS:  Extends the life of the system and promotes comfort.
    3Check and Adjust Bypass Humidifier DampersOpen bypass dampers allow cold air to go through humidifier and back into the furnace.  If the damper is open, it will lower the air conditioner's efficiency and can contribute to a frozen A-Coil, which means no cooling from the unit. (These dampers should be closed in summer and opened in winter.)BENEFITS: Prevents costly service calls and allows for maximum cooling.
    4Check Thermostat OperationAn improperly working thermostat can call for more or less cooling than you desire.BENEFITS: Saves money, increases comfort.
    5Check Thermostat SelectorThe Thermostat Selector controls the heat/cool switch in the thermostat.  If the selector is loose, or has begun to develop burnt contacts, it could contribute to a no-cool or no-heat situation.BENEFITS: Prevents costly service calls.
    6Check Circuit BreakerWe check for excessive corrosion, and over-heating of the fuse or breaker.  We also check for proper breaker labeling, as required by the National Electric CodeBENEFITS: Prevents costly service calls, and prevents system failure. Helps prevent fires.
    7Check Temperature Across the EvaporatorWe measure the actual degrees of temperature drop throughout your system.  This assists our technician in pinpointing whether or not your system is actually cooling to its full capacity.BENEFITS:  Assures that the system is operating correctly and efficiently.
    8Clean and Check Condensor CabinetWe check the condensor cabinet for signs of damage, i.e. a broken fan guard could hinder air through the coil and also allow children dangerous access to the moving fan and open electrical components.BENEFITS: Determines that a unit is safe to operate and is working at its peak efficiency.
    9Clean Condensor Drain PanThe condensor drain pan has several small drain holes in the bottom of the pan.  Leaves and other foreign debris can close these holes, allowing the pan to fill with water.  The water then can cover the refrigeration lines, coils, and even the bottom of the compressor motor, which can contribute to a shorter life of the air conditioning unit and expensive breakdowns..BENEFITS:  Prevents system damage and costly repairs.
    10Check Fins on Outside CondensorBy checking the fins on your unit, our technician can ensure peak air flow through your unit..BENEFITS:  Saves money, extends the life of your coils. Maximizes your unit's cooling  capacity
    11Clean Condensor CoilForeign material on the condensor coil reduces the system's capacity to remove heat from the house.BENEFITS: The coil is cleaned from the inside out.  Saves money, extends system life.
    12Check and Oil Condensor Fan MotorMost fan motors have oil ports to provide lubrication to keep the unit from unusual wear and tear through normal usage.BENEFITS:  Lubrication of the outside fan unit will extend its life.
    13Check Voltage and Amperage on MotorsImproper voltage and amperage can significantly reduce the life of the compressor, capacitors, and contactors.BENEFITS:  Extends electrical component life, saves money, and eliminates repairs.
    14Check Fan Blades for Tightness and PitchIf the fan blade is loose, or at the wrong pitch, the motor could be turning at the right speed, but the fan might not be running at the propere RPMs (revolutions per minute).  This would cause the unit to run hot and not cool the house properly.  It would also shorten the life of the fan motor.BENEFITS:  Extends component life, saves money, and prevents repairs and noisy operation.
    15Check Start and Run Relays and Contactors.Ensures that system will start and operate when needed.BENEFITS:  Prevents future service calls under crisis situations.
    16Check Temperature Across Condensor CoilsImproper refrigerant charge (too much or too little) could damage the compressor and would cause high electric bills through a curtailment of the system's efficiency.BENEFITS:  Saves money and conserves energy, prevents possible system damage.
    17Check Wiring AssemblyLoose connections cause improper voltage to various components, making them either inoperative or causing eventual failure.BENEFITS:  Extends life of system, ensures safety.
    18
    Check Head Pressure
    Like blood pressure in the human heart, if the Head Pressure in the air conditioning system gets too high, it can damage the valves that operate the system.BENEFITS:  Extends the life of the system, helps prevent expensive repairs.
    19Check Refrigerant LinesRefrigerant lines outside the home can be damaged by children standing on them. Lines should be checked for dents and kinks. Interior line insulation should be checked for proper coverage to prevent condensation from damaging furnishings, ceilings and walls.BENEFITS:  Helps prevent system failure and damage to property.  Saves money and provides for maximum cooling from the unit.
    20Check Furnace BlowerProper speed and air movement of blower cage are necessary for adequate air flow.BENEFITS:  Reduces costly service calls, saves money on utility costs.
    21Check Safety Pressure SensorsEssential for proper protection of the system..BENEFITS:  Extends system life, reduces the need for costly service calls.
    22Add Up to One Pound of Refrigerant at No Extra Charge, to Balance the System.This will normally cost between $50 and $100 if you were to call one of our competitors.  **NOTE** On July 1, 1992, a federal law went into effect preventing contractors from adding refrigerant to air conditioning systems with suspected or a history of leaks.  The unit must first be repaired or replaced before any refrigerant can be added.  This law was put into effect to prevent damage to the Earth's ozone layer.BENEFITS: Proper refrigerant charge assures comfort while extending the life of your compressor.
    23Provide Free Disposable (1" thick) Filter (Where Applicable)A dirty air filter can reduce the air flow over the evaporator coil, resulting in inadequate cooling of your home.  Dirty air filters are a major cause of increased utility bills.BENEFITS:  Extended blower life, improved performance and efficiency.
    24Duct InspectionJust as hardening of the arteries can damage the human body through a stroke, dirt buildup in the heating and cooling duct work will limit air movement and can severely choke the system. The A-coil has only 1/16" of air clearance, and can easily become plugged with dirt from dirty ducts.  Dirty air conditioning coils drastically affect the efficiency of the cooling system and shorten system life. BENEFITS:  The cleaner the duct system, the healthier the home, and the longer your equipment will last.
    25Make Final Operation CheckBefore we leave, we check all of our work to make certain that everything is working just the way it should.BENEFITS:  If you, the customer are completely satisfied with the work that we performed and will happily use us again and refer us to your friends.;
    26Advise Customer of Results of CheckWe believe that the customer is the most important part of our business.  We make special efforts to advise you of the current condition of your cooling system.  We believe that our customers want to know, and it's our job to provide them with this information.BENEFITS:  You are aware of the operating condition of your heating and cooling system.  This knowledge allows you to gauge effectiveness, efficiency and potential need for repair or replacement in the future.  Minimizes unexpected expenses.

Common Air Conditioner Problems

Common Air Conditioner Problems
Air conditioners often fail to cool the house or office. This is because of certain failures such as compressor overheating, blocked grills, outer fan malfunction, etc. in the unit.

Air conditioners are a blessing to the household, especially to those who dwell in sultry regions during the hot summers. Air conditioners eliminate the discomfort, one would go through, in the hot season. However, these air conditioners can fail without warning. There are some common problems with regards to air conditioners that occur as the air conditioner gets older. From refrigerant leakage, loud noise, electric control failure to frozen coils, there are several things that can go wrong with this power hungry cooling machine.

Size and Installation Issues
Often mistakes are made with the size of the air conditioner installed. It may be either too big or too small for the room. To avoid problems later on, one must ensure that an air conditioner of the appropriate size is installed. Moreover, improper installation of central air conditioning, ends up in leaking ducts and poor air flow. 

Leaking Refrigerant
The air conditioner will be low on refrigerant for two reasons. Either it was undercharged during installation, or the air conditioner leaks. In case of leakage, merely adding refrigerant will not suffice. A technician will have to be contacted, who will fix the leak, test the repair and then recharge the system with the right amount of refrigerant. The air conditioner works at its best efficiency when the amount of refrigerant matches exactly to the manufacturer's specifications. Both undercharging or overcharging affects the performance of the air conditioner. 

Wailing Noise
Loud and sometimes deafening noises can be heard coming from the air conditioner unit. These noises are usually caused by the fan belt. The fan belt can be dislodged from time to time. Restoring the fan belt to its rightful place can solve the problem. While positioning the belt, the bearings in the motor should also be checked. At times lubrication or replacement is needed. 

Bad Odor
Air conditions undergo constant warming and cooling, thereby resulting in the quick buildup of moisture. Inefficient evaporation of stagnant water results in molds, fungi, mildew, etc. thriving in the unit. Irregular changing of filters also spearheads bad odor. 

Problems with the Sensor
A thermostat sensor is present behind the control panel of the air conditioner. It measures the temperature of air entering the evaporative coil. In case this sensor is knocked out of position, the air conditioner may behave erratically or cycle constantly. The displaced sensor must be positioned carefully, all the way ensuring that the coil doesn't touch it. 

Electric Control Failure
All the electrical connections and contacts should be checked at the time of professional servicing. Often over-sized systems go on and off, resulting in the wearing out of fan controls and compressors. Moreover, if the outer fan stops running, the compressor overheats and gets damaged. 

Frozen Coils and Drainage Issues 
Frozen coils and ice prevent the combination of Freon and air from circulating, thereby blocking the unit's operation. Collaboration checks can eliminate this problem. The condensate drain is to be checked for clogging. Dirt collection in the filters and coils results in poor functioning of the air conditioner. The fans and compressor may also break down. 


Blocked Grills
Wipe the fan, motor, fins and other parts carefully, all the while ensuring that the electrical parts do not get wet. Care must be taken while removing the top grill, since it may be wired to the fan. Blocked grills are one of the most common problems in air conditioners, and can be solved by carefully cleaning the air conditioner parts. 

Stops working 
At times the air conditioner may stop working or may even not turn on. In such cases the fuse and circuit breakers are to be checked. The thermostat is to be adjusted to cool and below room temperature. The condenser power and furnace power switches are to be turned on. 

Problem with the Outside fan
The responsibility of transferring the heat from the house to the outside air lies with the outside fan. However, if the outside fan doesn't function properly, heat transfer from the house to the outer air does not take place efficiently. This may cause the compressor to overheat and trip. Internal damage can also occur to the compressor. 

The only way one can prevent all these problems is by investing in a preventive maintenance program. Routine maintenance tune-ups help detect low refrigerant, bad wiring, airflow problems, etc. NATE-certified technicians are qualified to make the necessary repairs.
Read more at Buzzle: http://www.buzzle.com/articles/common-air-conditioner-problems.html

Easy Air Conditioning Repair for the Most Common AC Problems

Easy Air Conditioning Repair for the Most Common AC Problems

air-conditioner-repair
Air conditioning repair does not have to be a hassle. When the AC breaks, the first thing that most people do is call a repair guy. After all, on a hot summer day, the last thing anyone wants is to sit around, sweating in a room without proper air conditioning.
Most people don’t know the first thing about air conditioners. So they don’t even realize that they can fix a lot of common problems on their own. You don’t have to wait around for someone else to help you.
If your air conditioner stops working, it’s important to first assess the problem yourself. This way, you can check to see if you can perform an immediate fix by yourself. In the worst case scenario, if you need the help of a professional, you’ll be able to tell them what the problem is! This will help the professional to finish his job even faster.
So if you want to assess the problems of your air conditioner, run through this list of the most common air conditioner problems to find out what’s wrong:

The Most Common Air Conditioning Repair Problems

The Air Conditioning Unit Won’t Turn On
This is usually caused by three issues:
  1. Broken thermostat – Check to see if the thermostat is working. If it isn’t, this can cause the entire AC to malfunction. Check out HomeDepot.com to make sure you’re using a reliable, progammable thermostat.
    air-conditioner-repair
    A broken thermostat can cause the entire AC system to malfunction
  2. Tripped circuit breakers – Check the circuit breakers near your AC unit. If you think there’s a problem, don’t just reset the breaker right away. Figure out what the problem was first, and then try a reset. If the breaker trips again, you should call a professional to take a look.
  3. Clogged vents – The outside unit is vulnerable to nature. Often times, the vents can get clogged up by growing vegetation, grass, dirt, and random debris. Unfortunately, if any debris gets sucked into the vents it can cause damage to the capacitor. If this happened, you will need to call a professional. To prevent clogged vents, it may help to purchase an air conditioner cover.
The AC is Making Strange Noises
Some air conditioning repair problems you can hear loud and clear!
While it’s normal for an AC unit to make some noise while it runs, some noises can indicate a problem. You should be wary of the following noises:
  • Vibrations / Rattling – If your AC unit is vibrating or rattling, it is likely that the unit is installed incorrectly. Have a professional check to ensure a proper installation
  • Squealing – Some older units are driven by belts rather than motors. A squealing noise can occur when the belt connected to the blower has slipped. If this happens, you should immediately turn off your AC and seek the help of a professional.
The Air Conditioner Is Running Inside, But Isn’t Cooling The House Properly
This is a common air conditioning repair problem. If the AC seems to be working on the inside, your problem may be on the outside. Let’s run through a check list of steps to asses the problem.
1. First, check the unit outside and hold your hand nearby to feel the air. See if you feel any heat leaving the house.
2. Take a look at the two refrigerant lines; there should be a larger and smaller line. Don’t touch the small line it may be hot to touch! and a little one. The larger line is usually colder and should have some condensation on it.
hvac-refrigerant-lines
You should have two refrigerant lines: a large one and a small one.
3. If the larger line is frosted, perform the next step. Otherwise, skip the next step.
4. A frosted line means there isn’t proper air flow across the coils of the inside unit. Or the unit is low on refrigerant. Turn the unit off at the thermostat by flipping the switch off, and then turn the fan from “auto” to “on” at all times. This way, the fan will run continuously and shut off the compressor. Once the fan runs for 30 minutes, you can check to see if there’s any improvements in the air flows coming out of the vents. You may also want to consider taking a look at your air filters. If they are dirty, they should probably be replaced.
After several more minutes, turn the thermostat back to a cool temperature. See if your house is cooling, and five minutes later, take another look at the large line outside. If the larger line is cool after that five minute period, your refrigerant level is probably good. This means hot air should be escaping the outside unit. If it’s still only barely cool air, then your refrigerant is probably low.
5. When the large line is not cooler, and the smaller line is not warmer, then you probably have a refrigerant problem or a compressor problem. In both of these cases, you will need to call a professional for repairs.
There’s a Problem with the AC’s Power or Wires
As you constantly turn on and off an air conditioner, it can take a toll on the AC’s compressor and fan controls. Your wires will suffer from corrosion and from general wear and tear. For electrical issues, you’ll often need a professional to stop by and to evaluate the proper solution. Check Lowes.com for any replacement wires needed.
The Thermostat is Not Picking Up the Right Temperature
Indoor air conditioners have a thermostat sensor which measures the temperature of the air that comes into contact with the evaporative coil. If this sensor is bumped out of place, your air conditioner may run erratically. Adjust the sensor by carefully bending the wire that holds it in place. The sensor should be near, but not touching the evaporative coil.
There’s a Problem with Drainage
When the temperature is humid, it may cause clogging in the condensate drain. Check the drain to make sure it isn’t clogged. If it is, make sure the condensate drain is mounted level.
The AC Unit is Low Refrigerant
Your refrigerator needs freon to cool the air. If your AC is low on refrigerant, or freon as it’s often called, it is very likely that you have a leak. Don’t just add more freon. You will often need a trained technician to fix the leak and test if the fix is working. Then he must charge the system with the proper amount of freon. You must make sure that you use the exact amount of refrigerant as recommended by the manufacturer, otherwise even more air conditioning repair problems may arise.
air-conditioner-repair
A professional should inspect your AC to see if you have the proper levels of refrigerant
The Air Conditioner’s Outside Fan is Not Working
The outside fan transfers the heat from the inside to the outside.  If the fan outside is not working properly, heat isn’t transferring to the outside and the AC compressor may be
overheating.
The AC Outside Isn’t Even Running
Most likely, the AC isn’t receiving any power. Check to make sure any wires and cords are plugged in and working properly.
The Coil Inside is Frozen
A frozen coil is usually the result of dirty air filters, blocked return air in the ducts, or low freon.
air-conditioner-repair-coils
Frozen coils are a common AC problem
For all other repairs, consider calling a repair man. After he gives you a quote, make sure to compare the costs of a repair to the costs of a new air conditioner. Check out the prices of new air conditioners to make sure that the repair is less than the cost of a new unit.
If you still have issues with air conditioning repair, check out these articles for more do it yourself AC solutions.